Deep Dive: Discussion

Deep Dive: Discussion
Welcome to the deep dive of the Discussion. The primary place subscribers spend time, this is the social feed you’ve used on other apps but even better. We’ll explain in a moment. The Discussion is where you can post anything you want, where you will foster great conversation, and the only place that subscribers interact with each other. In this article we will tour the Discussion and show you where everything lives. We will teach you how to add media to a post, how to poll your subscribers, how to schedule posts for a future date, how to tag posts for the search function, how to use the Discussion search function, how to react to posts, tag people in comments, how to edit your post, and maybe the most important, how to add a post to the Content page which is another key area of the platform. The Content page deep dive can be found here. It is a lot so let’s get started.
Quick Menu:
Post Composition Box
Discussion Search
Add Media to a Post
Add a Poll to a Post
Schedule Posts
The Send To Feature
Rich Text Editing
Tagging Posts
The Post Menu

At the top of the Discussion you will find what we call the Post Composition box. You can rename the Discussion to anything you want in the Theme Tool by the way.

The Post Composition box is made up of a few key elements. In the upper right you have the Discussion Search tool where you and your members can search keywords and look for conversations about a particular topic.

As you can see, you have the ability to search everything at once, only posts, comments, or even certain members if you notice that you like their replies or posts. This tool is super helpful for new comers looking to catch up on previously discussed topics.
Next in the Post Composition box we have main text field. This is where you do your typing and compose the worlds best new post.
Below the text box you will see a suite of tools. Just a heads up, the tools available to the platform owner will be far greater than members of that platform. Platform members only have the ability to add media to their posts and the ability to use the Rich Text Editor. From left to right let’s go over each feature now.

First is the media upload button. Here you can upload photos and videos directly to your platform. We support all major formats of content. We also support adding MP3s and PDFs for our music teachers out there. There are other ways to embed media into your posts with the rich text editor but we will discuss that in a minute.

Next we have the Poll feature. Here you can create polls and add them to your post. This is a great way to get feedback from your community and increase engagement. Who doesn’t love a good poll?
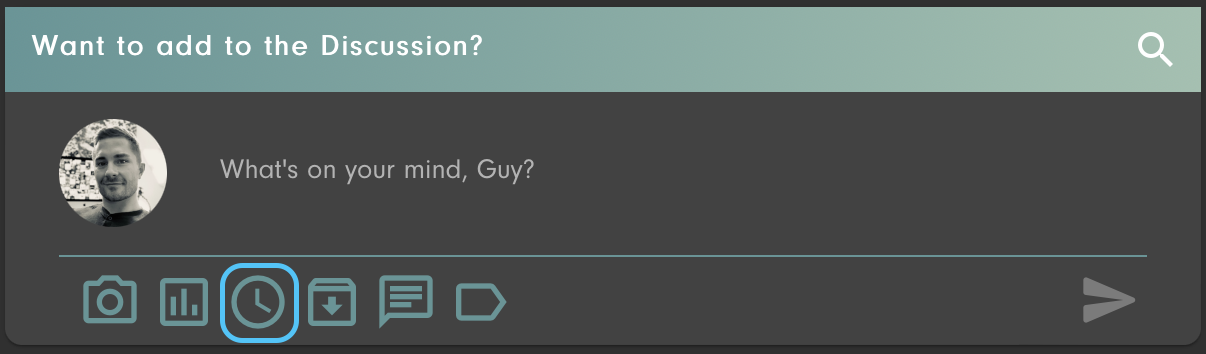
Next we have the Post Schedule feature that allows you to load posts in advance to keep your content flowing even if you are away. You can load as many posts as you want and they will land on your discussion page the moment their time arrives.

From there we move to the Send To.. Button. This one is incredibly important so we will spend a bit more time here. This button is used to send posts to either your Content Page, or your Archive. Sending to the archive is essentially choosing to create a post and send it to your vault for a future post, or content page addition. Think of the archive like storage. More on the Archive in the Operations article.
On to sending to the Content Page. This is the most streamlined way to populate your Content Page. When doing so, you can choose to skip the Discussion entirely, or post it in both places at once. When you choose to send your post to the Content Page you will be presented with a new menu. Let’s discuss it.

In the Send to Content menu you will be presented with several option. From the top down. Up above you will be able to select an existing Content Page Section to send your post to. That one is self explanatory. If you send it to an existing Section, once you click post on your new post it will land in the chosen section.
Below that, you will see that you can create a brand new section to send your post to. It will ask you to give your section a name and description. Just like if you were creating it over on the Content Page. Below that you can choose to make it a premium section, a Progress Based Section, or choose to hide it from discussion. If you need more information on any of these options just tap or hover over the question mark symbol next to the feature.
A Premium Section allows you to add a one time charge for access to your section.
A Progress Based Section allows you to add an achievement and quiz to the end of your section. More on Progress Based sections in the related blog.
Hiding it from the discussion does exactly what it says. If you click that your post will only land in your chosen section. Premium and Progress Based sections automatically hide from the discussion.
That is a brief summary on the Send To feature. Next, on to Rich Text Editing.

The Rich Text Editing feature allows you to create blog style posts by enabling size and text adjustments, listing with numbers or bullets, embedded links, photos, and videos. Above we discussed the Media Upload feature. The embedding of content differs from that feature in that embedding requires that that content be hosted elsewhere. With the Rich Text Editor you provide links to other sites, images, or videos around the web and this tool will add them to your posts.
The last feature in the tool bar that is available to you is Tags.
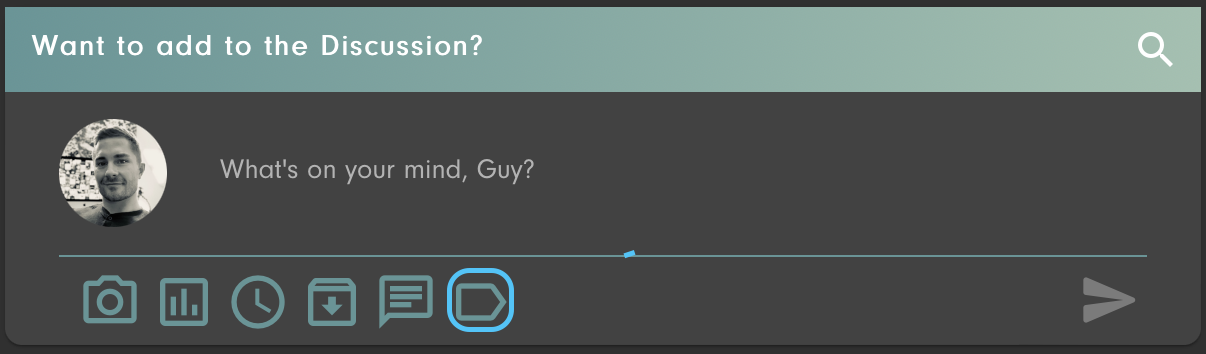
The Tags feature allows you to associate your post with keywords which make it searchable in both the Discussion search and the Content Page Search. In fact, if you send a post to the classroom with tags, members will be able to select that tag from a drop down menu in the search bar.

They will also be able to see those tags at the bottom of a Content Page section.

You can manage your tags in the Posts section of Operations.

That is a total breakdown of all features that you will find in your Post Composition Box at the top of the Discussion.Now, let’s move on to a post that already exists on the Discussion. If you have used legacy social media you should feel at home here. A post in the discussion has a primary body where your post lives, it has a menu in the upper right, and it has it’s comment section.

In any post box you will have the ability to react to a post by tapping or hovering over the big thumbs up icon. On hover, you will notice several reactions. You can also react to comments, and comment replies within a post to let people know how you feel about their contributions.
The three dots menu in the upper right provides you with several options. Let’s go over those now before wrapping out this already crazy long article.

The post menu allows you to Pin a post to the top of Discussion, Archive a post, add or modify tags on your post, add or remove your post to or from a Section in the Content page, Edit your post, or delete it all together.
Pinning a post keeps it attached to the very top of the Discussion until you choose to unpin it. This is great for welcome posts and posts that you want people to see each time they visit your discussion.
Archiving a post will remove it from the Discussion, and store it in your Archive that we mentioned below found in your Operations LINK tab.
Tags, Edit, and Delete have been explained. The other option that you see pictured allows me to remove that post from a Content Page Section. If this post wasn’t already connected to a section, I would have the ability to add it to a section with the menu below. You will be asked to give the post a title which then shows up as representation for that post inside of the chosen Content Page Section.
That summarizes every single button or feature you should come in to contact with inside of your discussion. The only thing left to talk about for now is how our Discussion algorithm works.
The Discussion algorithm is responsible for the order in which your posts are shown in the Discussion. We made it very intuitive. If nobody interacts with any posts the discussion content will be displayed chronologically. Then, as soon as you or a member interacts with any post, that post gets moved to the top of your discussion. This allows recent comments and reactions to highlight a post that might be older, and helps generate new conversation surrounding any given post regardless of that posts age. This means that every one of your posts can generate cool interactions and stimulate conversation for years to come.
We very much hope that this post has shed some light on our Discussion page and answered all of your questions. If you still have questions feel free to reach out on our content page, or if you have a platform you can head to your Dashboard and reach out with Chat support.
Take care, and we will see you on the Moon!


